There are so many different fittings in HPLC and so many that look alike, that interchangeability is a real problem. Let's see if we can provide some clarification.
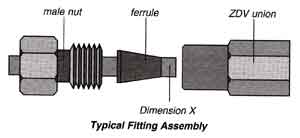
Take a zero dead-volume (ZDV) union, male nut and ferrule from one manufacturer. Put the male nut and ferrule on a piece of 1/16" O.D. stainless steel tubing. Insert the tubing, ferrule and nut onto the ZDV union. Be sure the tubing bottoms out in the union. Swage the ferrule onto the tubing and then remove the assembly from the port. Measure the distance from the end of the ferrule to the end of the tubing. Let's call this
"Dimension X."
(Continue to Dimension X tab)

Dimension X varies with each manufacturer. Dimension X can also vary from the same manufacturer due to variations in tolerances. Since there are these variations, we recommend that you use a fittings assembly only with the initial receiving port into which it was swaged if you are using all stainless steel fittings. Interchanging fittings assemblies and receiving ports can introduce leaks and/or dead-volume chambers to the flow path. We recommend new fittings, new ferrules and new connections each time assemblies are connected.

Here's an example: Valco, Parker, Swagelock® and Idex® / Upchurch Scientific® zero dead-volume fittings are interchangeable at the initial assembly. However, Dimension X is longer with a Waters® fitting. If a ferrule has been swaged in a Waters fitting and you then insert it into an Upchurch fitting, the ferrule will not seat and will leak (right side image).
Dimension X is too short with an Upchurch fitting. If the ferrule has been swaged in an Upchurch fitting and you insert it into a Waters fitting, the tubing will not bottom out and you will have a mixing chamber (left side image).

Several different sizes of fittings are used in HPLC. The most common sizes are 1/4-28, 10-32 and M6. The first two of these are U.S. Customary System measurements and the third, the M6, is measured in the international, or Metric System.
U.S. Customary System
Two numbers are used to describe a thread size. The first number describes the diameter of the threaded portion of the nut (not the tubing diameter).Thread diameter numbers range from 1 (0.073") to 12 (0.216"). Beyond 0.216" the thread description is the thread-per-inch count.
- Thus a 1/4-28 male nut has a 1/4" (0.250") diameter thread barrel and has 28 threads-per-inch.
- A 10-32 male nut has a 10 (0.190") thread barrel and has 32 threads-per-inch; a narrower nut with a denser thread count.
International Metric System
the metric system uses a one number thread description method. Metric nuts in HPLC have 1 thread-per-millimeter and the M simply stands for Metric. The single number refers to the diameter of the thread barrel in millimeters. Thus, an M6 nut has 1 thread-per-millimeter and is 6mm in diameter.


 Several different sizes of fittings are used in HPLC. The most common sizes are 1/4-28, 10-32 and M6. The first two of these are U.S. Customary System measurements and the third, the M6, is measured in the international, or Metric System.