 |
|||||||||

Comments
Most
models are set at the factory for 34 MPa (340 bar, 5000 psi), but sealing
pressure may decrease as the seal wears.
Sometimes a small scratch on the rotor seal can be temporarily “repaired” by adjusting for higher pressure (see Appendix B). Try this if you want to operate temporarily before seal replacement. If the handle becomes harder to turn after adjusting, you should loosen the injector back to the original setting when you install the new rotor seal.
Using a needle with a pointed tip or too small a diameter will severely damage the rotor seal and stator face assembly. The tip can enter port #4 of the stator face, where it is broken off when the handle is turned to INJECT. The protruding tip then scratches the rotor seal. The needle should be 0.7 mm OD (#22 gauge) x 5.1 cm (2 in) long and 90° point style (square-cut end). Do not use a beveled, pointed, or tapered needle.
In some injector orientations, a leak between the stator and stator ring will appear as though the leak is at a fitting in the stator. Likewise, a leak at a fitting may appear as though the leak is between the stator and stator ring. Confirm the true source of the leak before making adjustments.
Rheodyne RheBuild™ Kits are available for all injectors. Kits contain only genuine Rheodyne parts together with tools and instructions.
Symptom #3
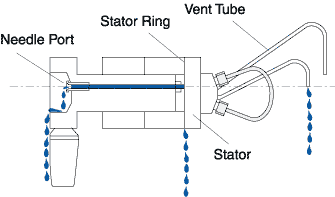
Fluid leaks continuously out of the needle port or vent tubes, or from between the stator and stator ring (see Fig. 9):
- If the
system pressure has increased lately — due, for example, to use
of a higher flow rate, different column, or partial plugging of a column
frit — and especially if it is above 27.6 MPa (276 bar, 4000 psi),
Cause A.
- If the system pressure has been stable, see Cause B.
Fig. 9. Fluid is shown leaking out of all locations.
Cause A
The system pressure may have exceeded the current sealing capability of the injector.Solution
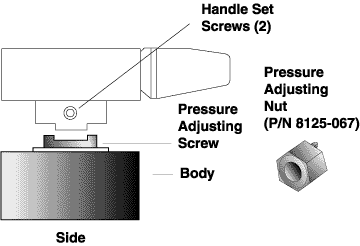
Adjust for higher pressure operation by (depending on the model) either tightening the pressure adjusting screw (see Fig.10) or loosening the set screws and then tightening the stator screws (see Fig. 11). For details see the procedure in the section "Adjusting for Leakage" or "Adjusting Setting of Injector Pressure" in the operating instructions for the injector. Operating Instructions are also available at www.rheodyne.com. See Appendix B for these instructions. If adjusting for higher pressure does not eliminate the leak, see Cause B.
Fig. 10. The pressure adjusting screw is tightened using the handle assembly (shaped to serve as a wrench) on models 3725, 7725, 9725, and 9726. Later versions of Models 8125 and 8126 also use this method; early versions use a pressure adjusting nut.
Cause B
A scratch on the rotor seal allows high pressure mobile phase to escape. This is referred to as cross-port leakage.Solution
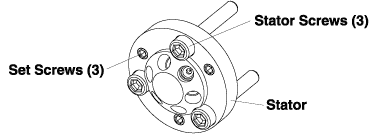
Adjust the vent tube(s) so that its outlet is at the same horizontal level as the needle port.Fig. 11. Model 7125 uses set screws and stator screws to adjust for higher pressure.
© 2000 Rheodyne All rights reserved