 |
|||||||||

Comments
Appendices
C and D discuss artifacts
mistaken as injector problems.
Ensure vent tubes are properly leveled (see Symptom #2) to prevent contamination from siphoning into the loop.
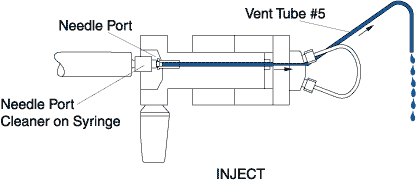
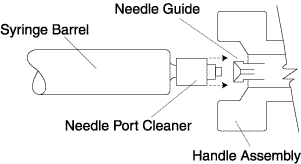
To flush the needle port: Use 0.1 to 1 mL of mobile phase. Use only a Needle Port Cleaner (Rheodyne Part Number 7125-054) attached to a luer tip syringe. Flush only in INJECT, so flow goes directly out vent tube #5 and bypasses the loop. This cleans the entire needle port — guide, tube, and needle seal. The cleaner seals against the front of the guide. A fully inserted needle flushes none of these parts. If you have no cleaner, use a luer tip syringe.
In routine operation, remove the syringe after turning to INJECT, but keep the handle in this position so the loop is continuously flushed with mobile phase. Flushing after every injection is rarely needed, but if necessary, do it just before the next analysis. It is usually sufficient to flush after every ten or twenty injections. This keeps liquid in the needle port tube which baths the syringe needle and dilutes contaminating sample.
The cement used for syringe needles can leach, especially with chlorinated solvents; if leaching happens, use a removable needle, which has no cement.
Symptom #5
Peaks unrelated to the previous sample or standard are produced by injecting a blank. Flush the needle port (see comments). Load and inject a blank, using the loading method that you used for the sample (see Fig. 18):
- If the
peaks are now absent, see Cause A.
- If the
peaks are still present:
Flush, return to LOAD, and immediately load and inject a blank equal to 1/4 loop volume. Observe peaks. Flush, return to LOAD, and immediately load and inject a blank equal to five loop volumes. Observe peaks. - If the peaks of the second injection are three to four times larger than the first injection, see Cause B.
- If the peaks of the second injection are not present or are much smaller than the first injection, see Cause C.
- If the peaks of the second injection are the same size as the first, see Cause D.
Fig. 18. Use of the needle port cleaner to flush the injector.
Caution: To avoid liquid squirting back at you, discharge syringe slowly.
Cause A
The needle port was contaminated. Flushing has cleaned it (see Fig. 19).Solution
In the future, flush the port routinely.

Fig. 19. Pathway of the flushing solvent using the needle port cleaner when the injector is in INJECT.
Cause B
External contaminants from the syringe, glassware, or solvent are inadvertently loaded.Solution
Use clean utensils. Avoid plastics which can leach contaminants. Investigate further to see if the artifacts are oxygen peaks (see Appendix D).
© 2000 Rheodyne All rights reserved
