 |
|||||||||

Comments
To
clean the injector: Test after each step to see if the problem is solved.
Contamination often is not the problem and decontamination can be time
consuming. You may want to rule out other causes first.
1) Flush the needle port, vent, and tube #6 using a variety of solvents. 2) Remove the stator, stator face assembly, and rotor seal (do not disassemble further). Thoroughly clean their passages using a variety of solvents, preferably in an ultrasonic cleaner. 3) Replace the rotor seal with a new one of the same polymer composition. 4) Replace the rotor seal with a new one of a different polymer composition. In either case, use only genuine Rheodyne parts.
Although we have said (previous page) that you should flush only in INJECT, it is helpful to flush also when in the LOAD position if you are troubleshooting Cause D. This will clean out vent tube #6, a possible source of contamination that can diffuse back into the loop.
Peaks obtained in the confirming experiments of Cause D can sometimes come from the column, not the injector. See Appendix C.
Symptom #5 (Continued)
Cause C
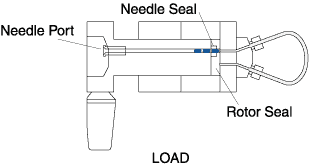
Trace contaminants within the injector are loaded. For example, contaminants in the needle seal (see Fig. 20) are pushed into the loop as the needle enters the seal. When sample is dispensed from the syringe, the contaminants will be flushed completely out of the loop only if a considerable excess of sample is loaded. Contaminants will remain when partial-filling is used.Solution
Clean the injector (see comments), however other solutions are sometimes easier. If you are using partial-filling, try complete-filling and use a smaller loop if necessary.
Fig. 20. Droplets of sample remaining in needle port and needle seal.
Cause D
Trace contaminants within the injector are "injected" simply by switching from LOAD to INJECT or from INJECT to LOAD.
To confirm: Flush in the LOAD position (an exception to the rule, see comments on previous page) to clean vent tube #6 (see Fig. 21). Then turn to INJECT and wait for any peaks to elute. Ignore them. Now flush normally. While still in INJECT, insert a very clean, empty syringe and keep it in place to prevent remaining contaminants in vent tube #6 or the needle seal from siphoning or diffusing into the loop. Turn the handle to LOAD and start the recorder without turning to INJECT. Wait for peaks to elute. Observe them. Now, with the syringe still in place, turn the handle to INJECT and start the recorder. Observe the peaks. Peaks in either or both of these runs indicate internal contamination, most likely on the rotor seal.
Solution
Clean the injector (see comments).
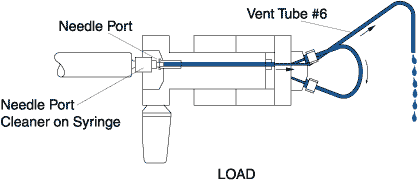
Fig. 21. Pathway of the flushing solvent using the needle port cleaner when the injector is in LOAD.
© 2000 Rheodyne All rights reserved